Git is a free, open source distributed version control system (DVCS) designed to handle everything from small to very large projects with speed and efficiency.
In addition to working as a DVCS, Git also acts as a local repository, a place where the complete history of your work is stored. When you use Git, your file history is stored in a .git subdirectory of your working copy, so you can work with your full revision history without requiring connection to a central server.
This article will serve as an introduction to what a Git Repository is all about.
Git is a distributed version control system. It originated from Linux kernel development, and is used by many popular open source projects, such as the Android or the Eclipse development teams, as well as many commercial organizations. The core of Git was originally written in the programming language C, but Git has also been re-implemented in other languages, such as Java, Ruby, and Python, although the main development continues in C.
There are two main approaches to a Git project:
After cloning or creating a repository, the user will have a complete copy of the repository. He can then perform version control operations against this local repository. If he so chooses, he can configure the repository as a bare or a non-bare variant.
Bare repositories are only used on servers to share changes coming from different developers, and contain no local changes. Non-bare repositories let you make changes via the modification of your working copy files. This also allows you to create new versions in the repository.
If you want to delete a Git repository, you can simply delete the folder which contains the repository.
Git also allows the user to synchronize the local repository with other remote repositories. Users with sufficient authorization can push changes from their local repository to remote repositories. They can also fetch or pull changes from other repositories and bring these changes to their local Git repository.
Git supports branching, which means that you can work on different versions of your collection of files. A branch separates these different versions, and allows the user to switch between these versions to work on them. Branches in Git are local to the repository, although it is possible to push branches to a central Git repository if you wish to share them with other users.
A branch created in a local repository, which was cloned from another repository, does not need to have a counterpart in the remote repository. Local branches can be compared with other local branches, and with remote tracking branches. A remote tracking branch proxies the state of a branch in another remote repository. Git supports the changes from different branches, and they can be combined through a system which also allows developers to automate such a process.
Choosing a repository for your software project is not unlike choosing where to host a website. The option you choose will depend on your circumstances, particularly the functionality you require, the amount of effort required to manage the project, the popularity of the service amongst the community you work in, and the size and diversity of contributors to your project.
Compared to other version control systems such as Subversion (SVN), an individual Git repository tends to be used for only one project, or perhaps even only one component of a larger project. This compares with SVN, where an organization may choose to have one repository that contains many independent projects. This separation is usually done to reduce network bandwidth, since cloning a Git repository involves copying the complete history of the project.
Many developers now prefer to use a distributed version control system such as Git over a more centralized system. The speed and convenience of always having a full repository history available locally can provide a significant productivity boost, while the improved branching merging options allow for many different development workflow scenarios that were difficult or not possible before.
These additional features and flexibility do come at a cost however, with the Git commands being considerably more complex to learn and master than other version control systems. However, once developers make the investment to learn Git they will begin to reap the benefits of this new approach to version control.
TortoiseSVN is the easiest and most popular way to use Subversion under Windows operating systems. Getting started couldn’t be easier – this post provides step-by-step-instructions on how to connect to ProjectHut using TortoiseSVN and make your first commit.
Note: these instructions assume that you have already:
Once you have completed these steps, you can start using TortoiseSVN on your computer.
Copy link address to store the repository URL in the clipboard. 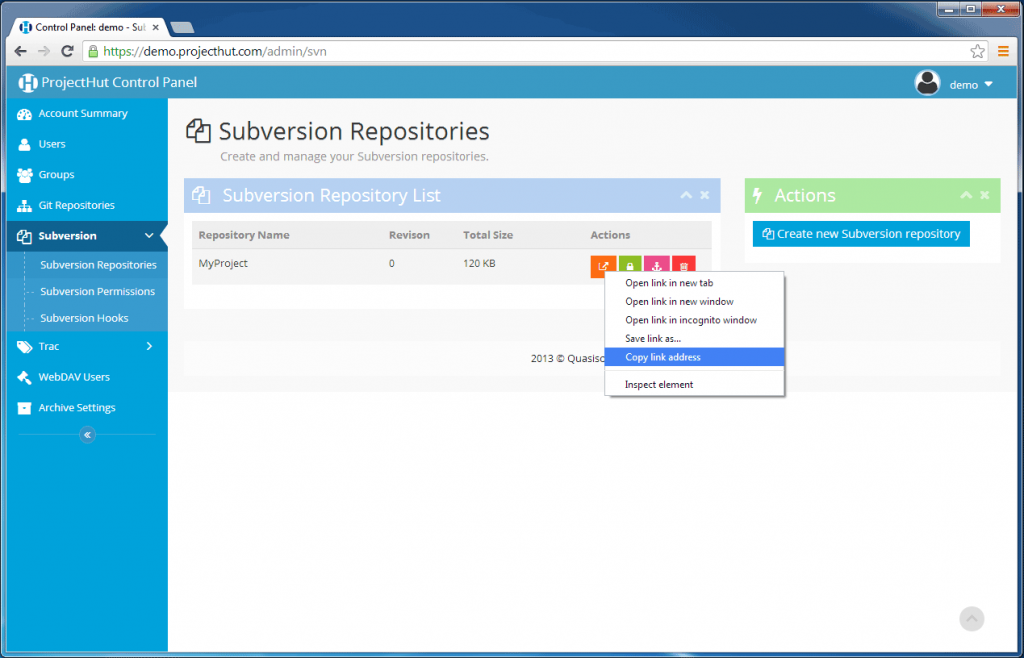
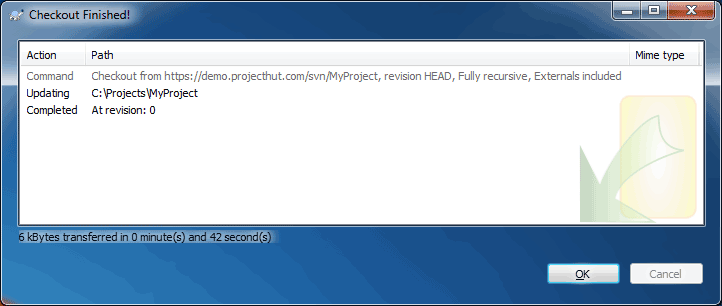
SVN Checkout... button. 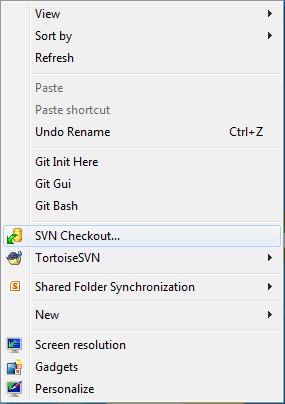
URL of repository: field, specify the Checkout directory:, and click OK. 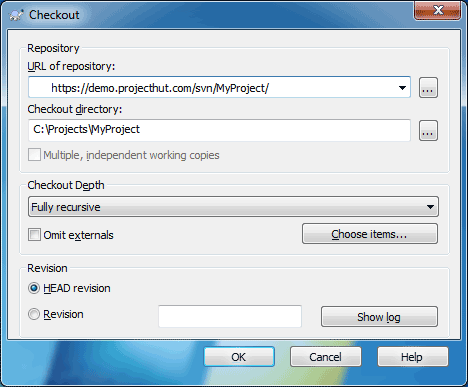
Save authentication checkbox to avoid having to re-enter the credentials each time you use TortoiseSVN. 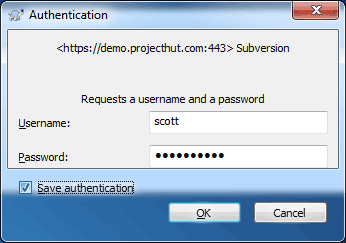
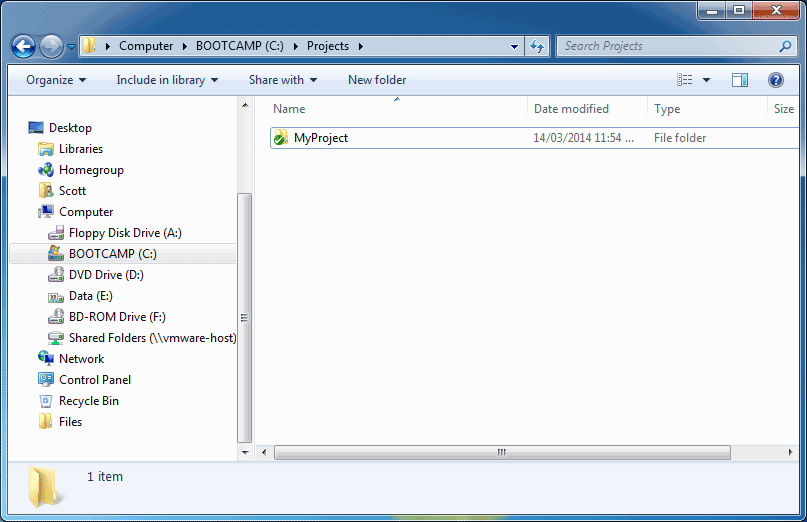
Once you have checked out a local copy of your repository, you can start using it by adding files.
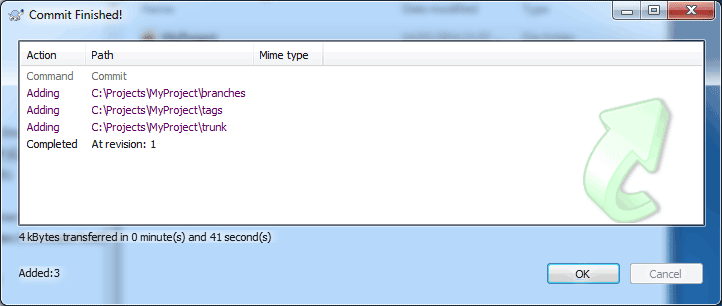
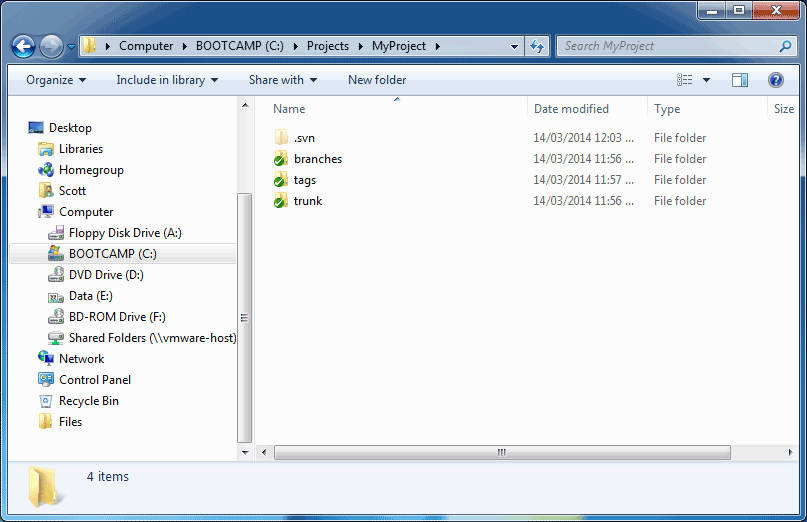
In this example, we will begin by creating three top-level directories that make up a typical SVN repository (trunk/, branches, and tags/). Read our FAQ article on How to structure a SVN repository for a description of why this is a good idea.
branches, tags, trunk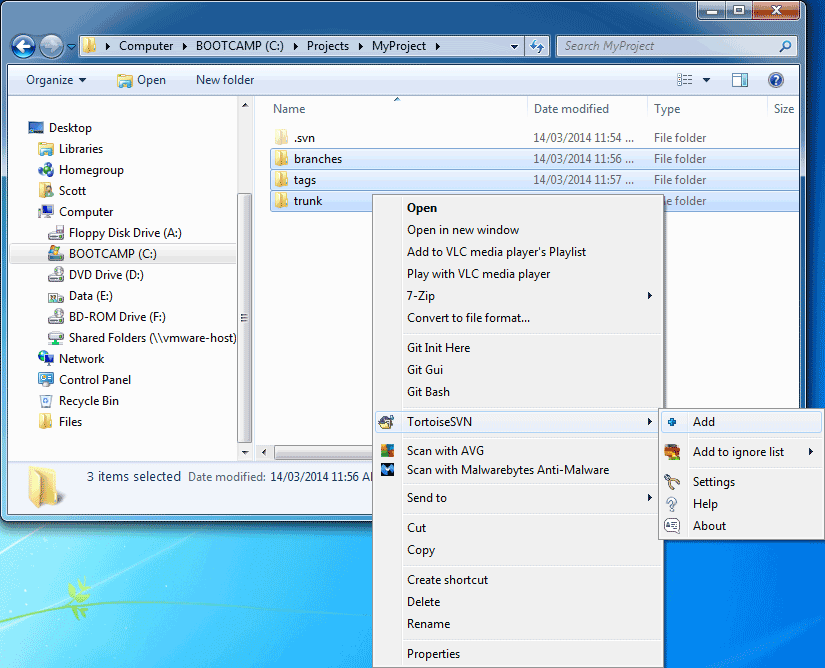
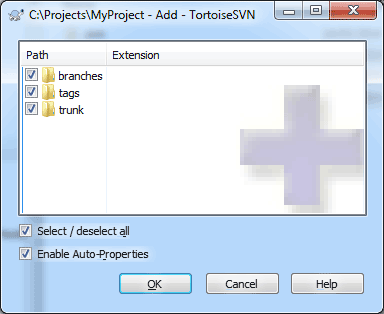
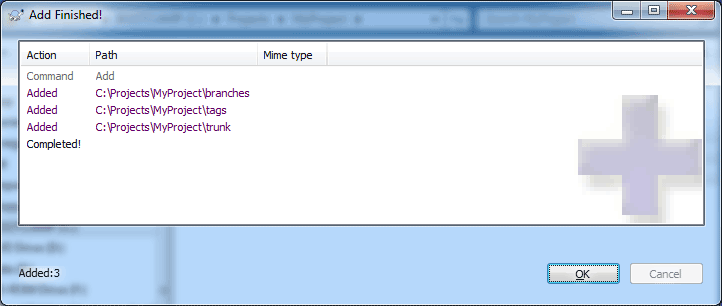
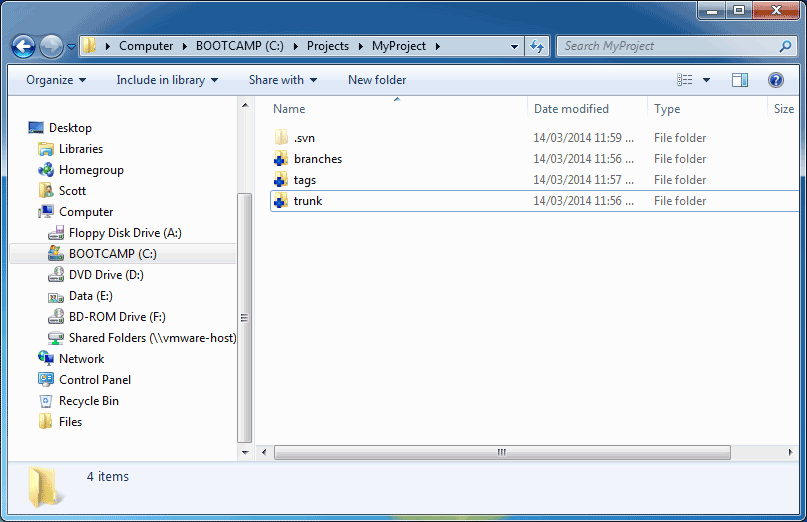
At this point, you may continue adding extra files or directories to the local repository. Likewise, you can also remove files if you no longer want to check them in. In this case, we are happy to add the three directories, so we will leave them as is.
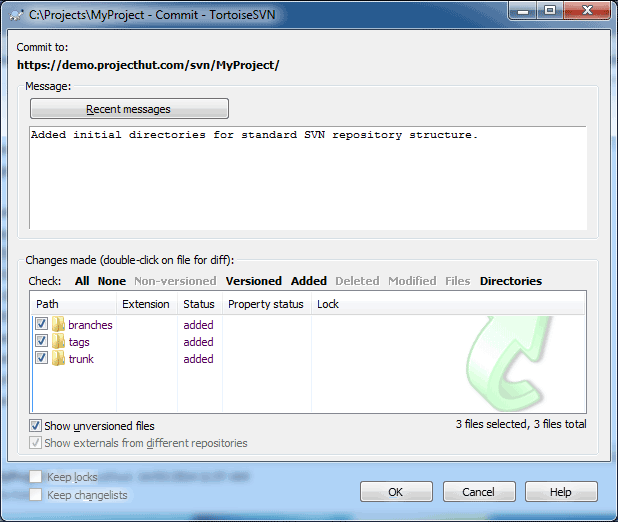
When you are happy with the state of all the files in your local repository, you can commit the changes to upload them to the SVN repository stored on the ProjectHut server.
SVN Commit... 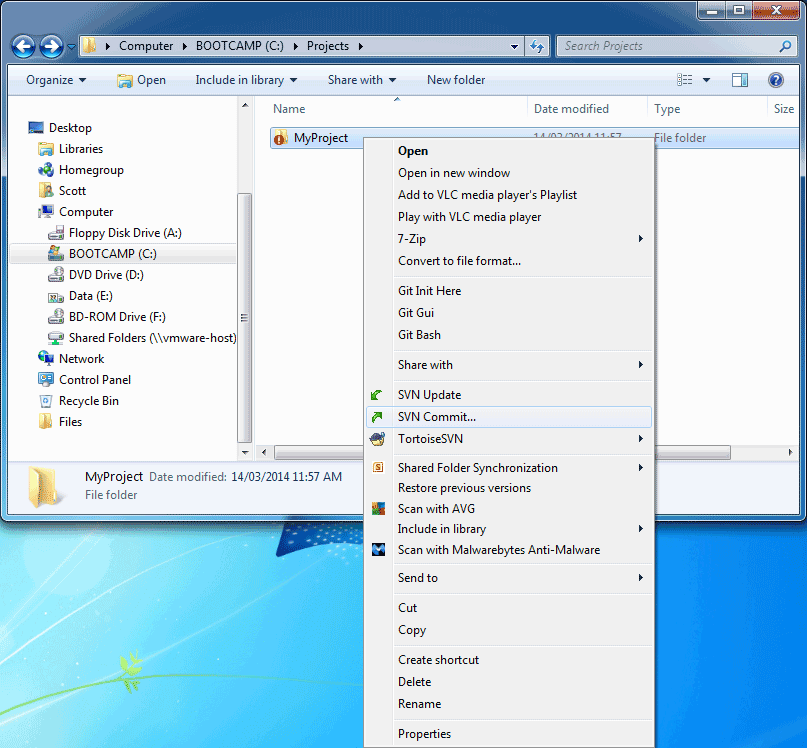
That’s essentially all there is to start using TortoiseSVN to commit files to your ProjectHut SVN repository!
During December 1986, Dick Grune released a bunch of shell scripts by posting it to newsgroup comp.sources.unix. It contained many of the conflict resolution algorithms used in software that had been useful for many programmers for decades. This software was called CVS version control.
Concurrent Version System (CVS) is open source software that records the history of your documents and source code. It tracks all changes in your files and saves all revisions without taking up too much disk space. It was originally built for programmers working on computer source code, as sometimes a bug is introduced when a certain modification is done on the software they are working on. However, by using CVS (or other version control systems such as Subversion and Git that have been developed since), they can easily restore the previous revisions of their files to determine what changes introduced the bug.
CVS version control is free, downloadable, and is easy to install and understand. Using CVS version control allows you to work on a file system using several machines. For example, you are working on a source code on your personal computer. You can access the repository using another computer and make local copies of the files. When you are finished editing the file, you can commit it back to the repository, and the CVS version control updates the file. CVS help prevent source trees from getting out of sync, hence preventing much confusion.
Also, CVS version control is a great tool for large projects with multiple users. It enables users to work on a single file and make edits to such file at the same time. The users save a local copy of the file and make their modifications. When they are finished making the necessary changes, they commit the files back into the repository. The users have an option to merge their files individually, then CVS merges all the changes to one final file. In case there are problems that arise from merging the file, the software alerts the users to make corresponding decisions.
CVS is also recommended for users with a slow Internet connection. They can simply make local copies of the files from the repository and edit them offline. When they are finished, they can connect to the Internet and CVS will sync the files.
Though CVS version control might be useful in some instances, it also has a number of limitations. CVS is a mature technology and lacks some functionality that newer version control tools have. For instance, CVS version control is not capable of atomic operation support, which prevents corruption of the source code should the network connection be interrupted. An atomic operation is a sequence of instructions that is guaranteed to be executed in succession, without any disruption, or not at all. An interrupted CVS connection may result in partial commits..
CVS also contains some security risks from symbolic links to files, and has not been updated since 2008. Moving or renaming files in CVS also does not include a version update, and branch operations in CVS are expensive, as CVS is not designed for long term branching.
Nowadays, CVS version is replaced by Subversion (SVN), which was originally made as an alternative to CVS. It fixes many of the bugs and issues inherent in the CVS system while maintaining high compatibility with it. Unlike CVS, SVN employs atomic operations which prevent corruption in the database.