The Old Programmer’s Bible reads thus: “Every program contains at least one bug, and can be reduced in length by at least one instruction.” Another way of saying this is that any program is never truly finished. There is always something that needs to be added, redone, or fixed.
Before a software project is released in the market and becomes public to users, its quality is usually ensured by a process of issue tracking. But have you ever wondered why issue tracking is sometimes the critical view in software development?
Issue tracking contains all the bugs, issues and defects of a system. This is where the members of the team in the assigned project raise their issues so that the developers can review and change their source code for the system.
The most basic use of issue tracking software in any development project is that it gives developers the ability to keep track of any new and ongoing problems with their software. There’s also the added bonus of consolidating multiple related (or worse, duplicate) issues, and checking which ones are still in progress.
This might sound excessively simple, but in a big development project, being able to track all of these issues in a single place can make improving a program a much more manageable endeavor. This is essentially what issue tracking brings: a way of keeping a project from getting out of hand.
Some of the features that come in handy in project issue tracking include: issue management and issue classification.
Issue management helps you properly work with the issues that are important to your organization. This feature helps you do this in a way that is supported both by the control center’s workflow and also the workflows of other processes within your organization. Issues that are false positives or those that are already resolved can be excluded from future views of a particular report.
Issue classification enables you to mark open issues as fixed, in progress, as done, or as invalid. This serves to reduce confusion, and helps in tracking progress more efficiently.
An issue tracking system is usually used for fixing bugs in software projects, but it can also be used in other areas which don’t deal with software. The primary advantages of an issue tracking system are:
Issue tracking systems, if used in the right way, can do the following:
Just because a program is consistently evolving doesn’t mean that the process has to be long and difficult. Issue tracking for software projects is just one of the tools you can use to ensure that you don’t have to turn every new bug in your system into a management nightmare.
 In the past few days there has been considerable worldwide interest in the “Heartbleed Bug” – a recently discovered vulnerability in the OpenSSL encryption library. This library provides the HTTPS encryption capability that secures much of the world’s Internet traffic.
This bug is serious, as it potentially allows the encrypted communications from an affected server to be decrypted by a third party without the knowledge or consent of the server owner.
We are happy to reassure all our customers that ProjectHut is NOT affected by the Heartbleed Bug.
This vulnerability only affects specific versions of OpenSSL, and neither our customer account servers, the main ProjectHut website or customer Member Center have an affected version installed.
As such, all customers can rest assured that none of their account data or personal information has in any way been revealed as a result of this bug.
With more and more data being created every day and more of our business and lives moving into the online world, many people underestimate the importance of maintaining effective backups of their data.
It is important to consider: what would the cost be to you, in terms of both time and monetary value, if your computer crashed or was stolen and you lost all your work?
Many computer users may be familiar with the Backup Rule Of Three, otherwise known as the 3-2-1 Rule. Briefly stated:
3 copies of anything you care about – Two isn’t enough if it’s important.
2 different formats – Example: Dropbox+DVDs or Hard Drive+Memory Stick or CD+Crash Plan, or more.
1 off-site backup – If the house burns down, how will you get your memories back?
At ProjectHut, we provide the tools to help you meet the 3-2-1 Rule and keep your critical data safe.
By hosting your SVN, Git and Trac data at ProjectHut, you immediately gain the benefit of one off-site backup. Should your local computer be lost or destroyed, your data will be safe on our servers.
In addition, we also internally maintain our own off-site backups of your data, kept in a separate datacenter from our customer account servers. These backups are synchronised hourly, and provide a second level of protection, in the unlikely event that any of our servers should suffer catastrophic failure.
We also offer a third level of backup protection, in the form of a downloadable daily account archive.
The downloadable account archive contains the following information:
These backups are generated by running the appropriate administrative tools for each type of data. For example, for SVN repositories, the backups are generated using the svnadmin hotcopy command, while Trac backups are generated using the trac-admin hotcopy command.
Git backups are generated by copying the refs and packed-refs files first, followed by the remainder of the repository files in order to prevent the chance of data loss (as per this discussion on the Git mailing list).
Once generated, the backups are archived and compressed as a .tar.gz file.
Should you ever need to restore this data locally, or move your data to another service, you can simply expand this archive and all your repository data will be ready to use!
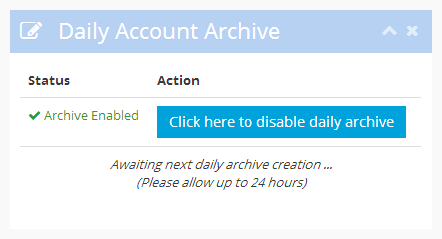
The daily archive is an optional feature of your ProjectHut account. To enable it, simply follow these steps:
Click here to enable daily archive button. 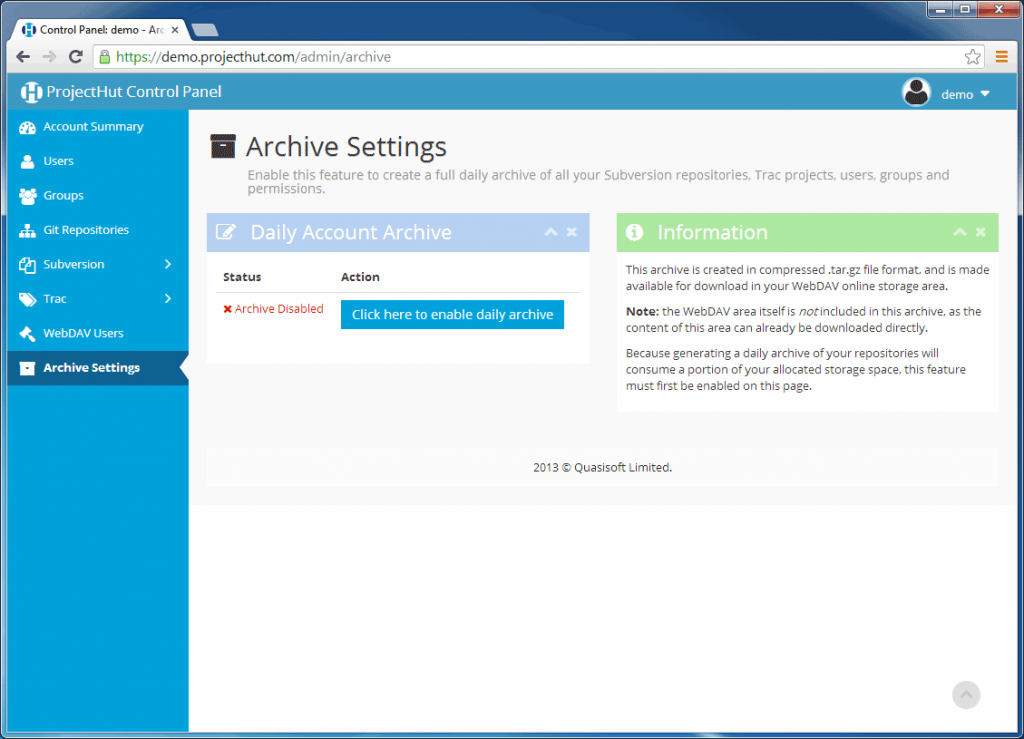
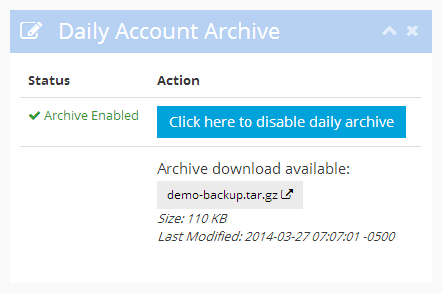
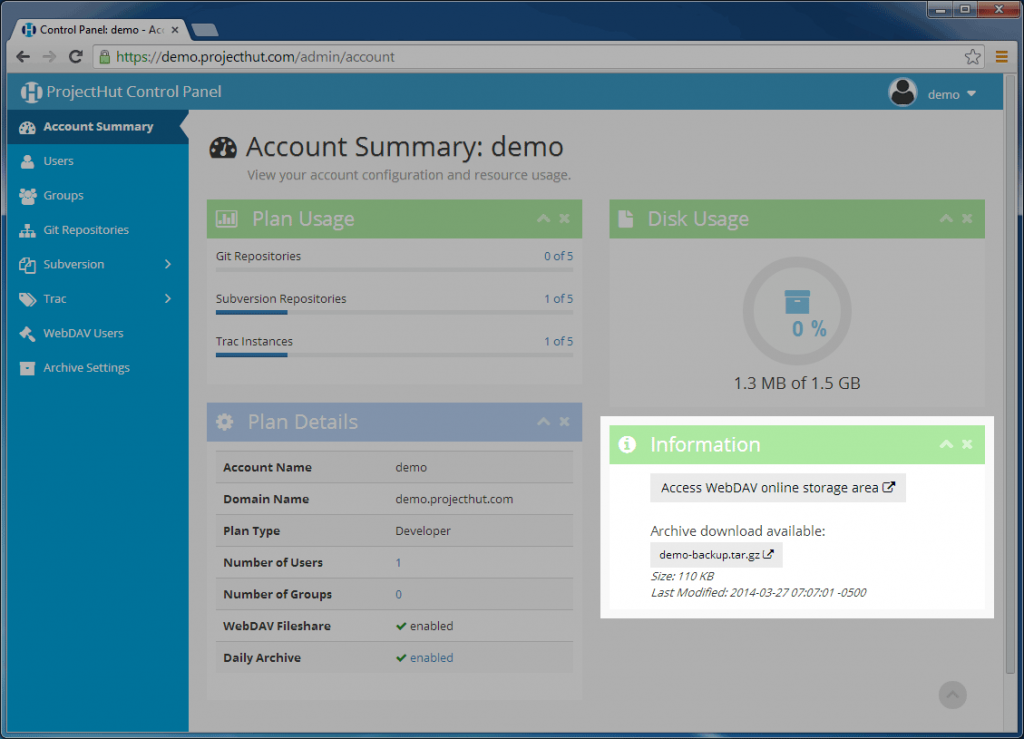
With this link, you can now download the backup archive and store it somewhere for safe-keeping. We recommend downloading the archive regularly and storing it in a third location separate to your computer, either on a separate medium such as flash drive or CD/DVD, or at a third-party backup provider, such as Dropbox or Amazon S3.
The daily backup archive file is also made available in your WebDAV area, so you can also download it by simply copying the file using your WebDAV client. Refer to our WebDAV instructions for more information on how to connect using WebDAV.
For security reasons, in order to download the Archive you will need to provide valid User credentials. By default, all registered Users have access to the WebDAV area. You can further restrict access to just a subset of your Users by using the WebDAV Users menu.
By leveraging the features provided in your ProjectHut account, it is a easy and straightforward process to maintain the best-practice 3-2-1 backups of your critical project data. We highly recommend that all users enable and make use of the daily archive feature as a core part of their business resilience practice.
Git is a free, open source distributed version control system (DVCS) designed to handle everything from small to very large projects with speed and efficiency.
In addition to working as a DVCS, Git also acts as a local repository, a place where the complete history of your work is stored. When you use Git, your file history is stored in a .git subdirectory of your working copy, so you can work with your full revision history without requiring connection to a central server.
This article will serve as an introduction to what a Git Repository is all about.
Git is a distributed version control system. It originated from Linux kernel development, and is used by many popular open source projects, such as the Android or the Eclipse development teams, as well as many commercial organizations. The core of Git was originally written in the programming language C, but Git has also been re-implemented in other languages, such as Java, Ruby, and Python, although the main development continues in C.
There are two main approaches to a Git project:
After cloning or creating a repository, the user will have a complete copy of the repository. He can then perform version control operations against this local repository. If he so chooses, he can configure the repository as a bare or a non-bare variant.
Bare repositories are only used on servers to share changes coming from different developers, and contain no local changes. Non-bare repositories let you make changes via the modification of your working copy files. This also allows you to create new versions in the repository.
If you want to delete a Git repository, you can simply delete the folder which contains the repository.
Git also allows the user to synchronize the local repository with other remote repositories. Users with sufficient authorization can push changes from their local repository to remote repositories. They can also fetch or pull changes from other repositories and bring these changes to their local Git repository.
Git supports branching, which means that you can work on different versions of your collection of files. A branch separates these different versions, and allows the user to switch between these versions to work on them. Branches in Git are local to the repository, although it is possible to push branches to a central Git repository if you wish to share them with other users.
A branch created in a local repository, which was cloned from another repository, does not need to have a counterpart in the remote repository. Local branches can be compared with other local branches, and with remote tracking branches. A remote tracking branch proxies the state of a branch in another remote repository. Git supports the changes from different branches, and they can be combined through a system which also allows developers to automate such a process.
Choosing a repository for your software project is not unlike choosing where to host a website. The option you choose will depend on your circumstances, particularly the functionality you require, the amount of effort required to manage the project, the popularity of the service amongst the community you work in, and the size and diversity of contributors to your project.
Compared to other version control systems such as Subversion (SVN), an individual Git repository tends to be used for only one project, or perhaps even only one component of a larger project. This compares with SVN, where an organization may choose to have one repository that contains many independent projects. This separation is usually done to reduce network bandwidth, since cloning a Git repository involves copying the complete history of the project.
Many developers now prefer to use a distributed version control system such as Git over a more centralized system. The speed and convenience of always having a full repository history available locally can provide a significant productivity boost, while the improved branching merging options allow for many different development workflow scenarios that were difficult or not possible before.
These additional features and flexibility do come at a cost however, with the Git commands being considerably more complex to learn and master than other version control systems. However, once developers make the investment to learn Git they will begin to reap the benefits of this new approach to version control.
TortoiseSVN is the easiest and most popular way to use Subversion under Windows operating systems. Getting started couldn’t be easier – this post provides step-by-step-instructions on how to connect to ProjectHut using TortoiseSVN and make your first commit.
Note: these instructions assume that you have already:
Once you have completed these steps, you can start using TortoiseSVN on your computer.
Copy link address to store the repository URL in the clipboard. 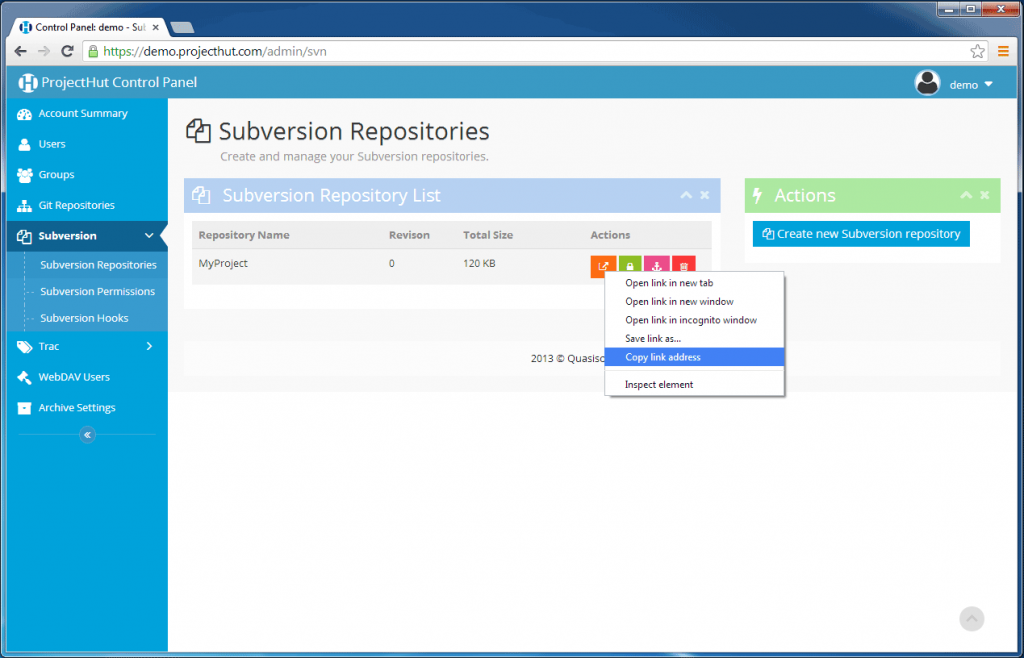
SVN Checkout... button. 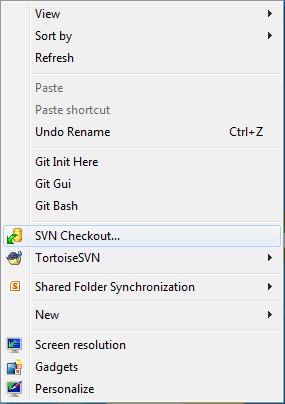
URL of repository: field, specify the Checkout directory:, and click OK. 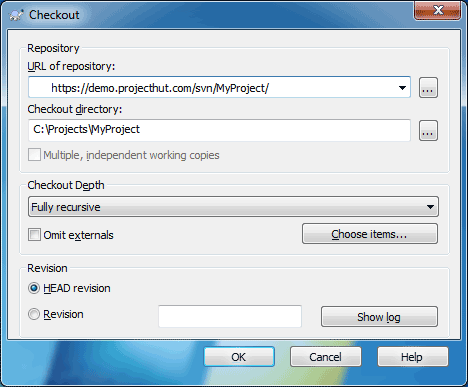
Save authentication checkbox to avoid having to re-enter the credentials each time you use TortoiseSVN. 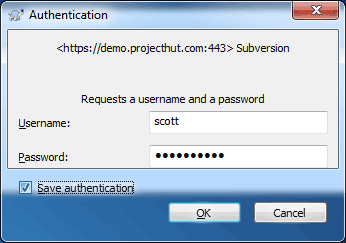
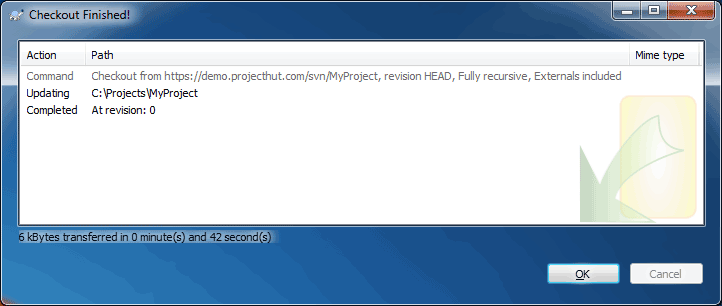
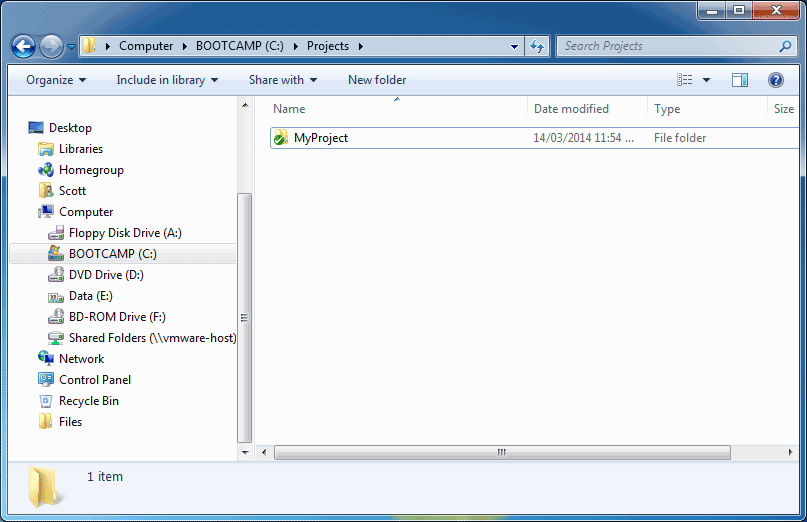
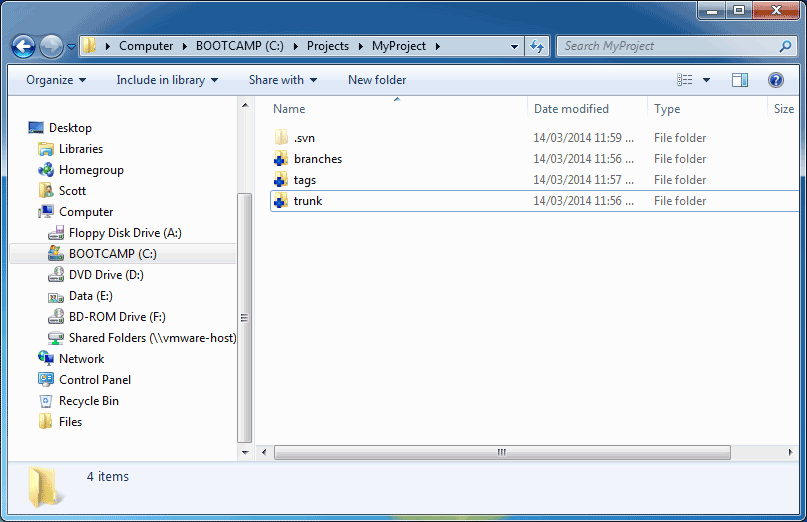
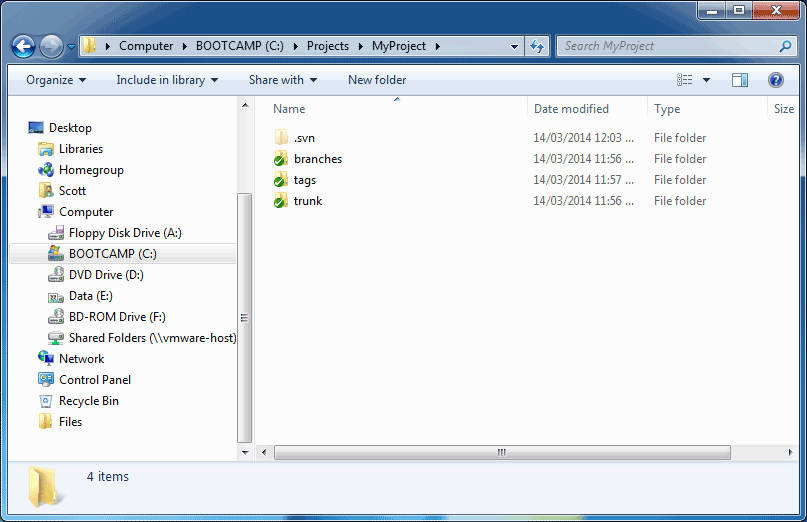
Once you have checked out a local copy of your repository, you can start using it by adding files.
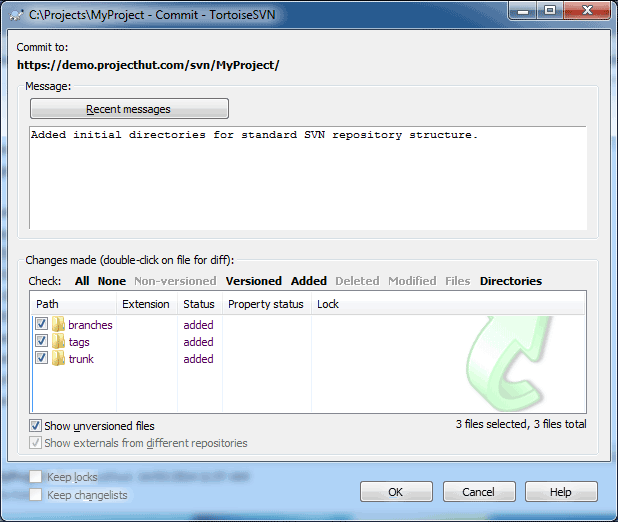
In this example, we will begin by creating three top-level directories that make up a typical SVN repository (trunk/, branches, and tags/). Read our FAQ article on How to structure a SVN repository for a description of why this is a good idea.
branches, tags, trunk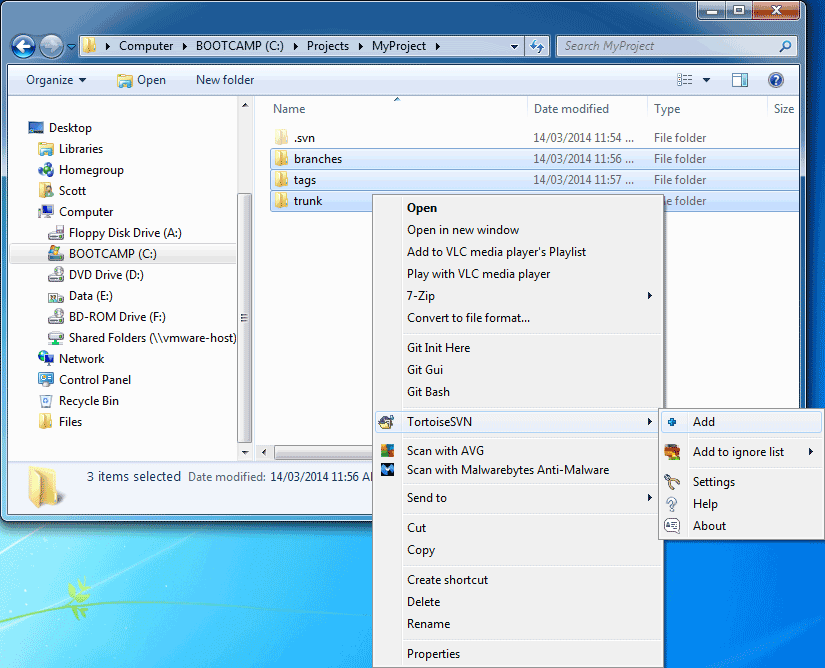
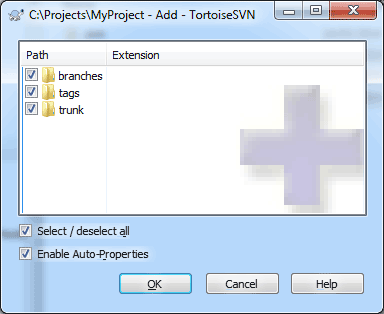
At this point, you may continue adding extra files or directories to the local repository. Likewise, you can also remove files if you no longer want to check them in. In this case, we are happy to add the three directories, so we will leave them as is.
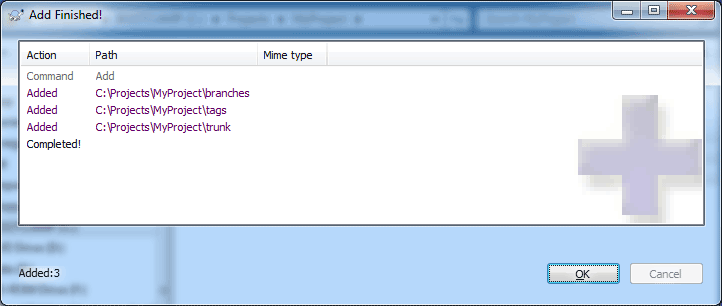
When you are happy with the state of all the files in your local repository, you can commit the changes to upload them to the SVN repository stored on the ProjectHut server.
SVN Commit... 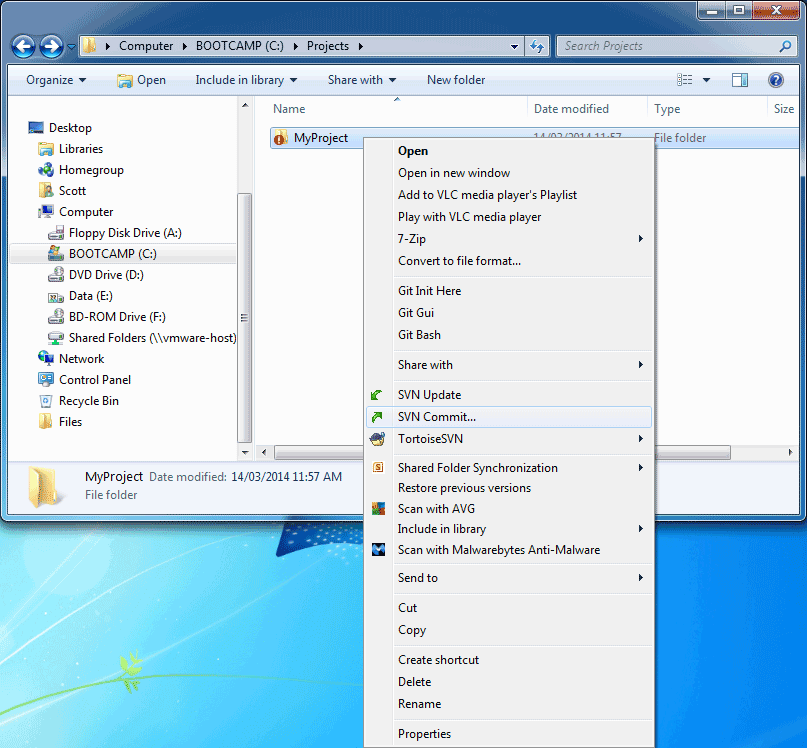
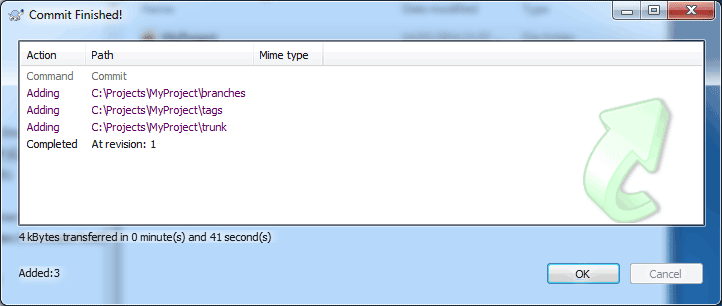
That’s essentially all there is to start using TortoiseSVN to commit files to your ProjectHut SVN repository!
During December 1986, Dick Grune released a bunch of shell scripts by posting it to newsgroup comp.sources.unix. It contained many of the conflict resolution algorithms used in software that had been useful for many programmers for decades. This software was called CVS version control.
Concurrent Version System (CVS) is open source software that records the history of your documents and source code. It tracks all changes in your files and saves all revisions without taking up too much disk space. It was originally built for programmers working on computer source code, as sometimes a bug is introduced when a certain modification is done on the software they are working on. However, by using CVS (or other version control systems such as Subversion and Git that have been developed since), they can easily restore the previous revisions of their files to determine what changes introduced the bug.
CVS version control is free, downloadable, and is easy to install and understand. Using CVS version control allows you to work on a file system using several machines. For example, you are working on a source code on your personal computer. You can access the repository using another computer and make local copies of the files. When you are finished editing the file, you can commit it back to the repository, and the CVS version control updates the file. CVS help prevent source trees from getting out of sync, hence preventing much confusion.
Also, CVS version control is a great tool for large projects with multiple users. It enables users to work on a single file and make edits to such file at the same time. The users save a local copy of the file and make their modifications. When they are finished making the necessary changes, they commit the files back into the repository. The users have an option to merge their files individually, then CVS merges all the changes to one final file. In case there are problems that arise from merging the file, the software alerts the users to make corresponding decisions.
CVS is also recommended for users with a slow Internet connection. They can simply make local copies of the files from the repository and edit them offline. When they are finished, they can connect to the Internet and CVS will sync the files.
Though CVS version control might be useful in some instances, it also has a number of limitations. CVS is a mature technology and lacks some functionality that newer version control tools have. For instance, CVS version control is not capable of atomic operation support, which prevents corruption of the source code should the network connection be interrupted. An atomic operation is a sequence of instructions that is guaranteed to be executed in succession, without any disruption, or not at all. An interrupted CVS connection may result in partial commits..
CVS also contains some security risks from symbolic links to files, and has not been updated since 2008. Moving or renaming files in CVS also does not include a version update, and branch operations in CVS are expensive, as CVS is not designed for long term branching.
Nowadays, CVS version is replaced by Subversion (SVN), which was originally made as an alternative to CVS. It fixes many of the bugs and issues inherent in the CVS system while maintaining high compatibility with it. Unlike CVS, SVN employs atomic operations which prevent corruption in the database.
Using version control with Subversion enables you to manage all the changes in your files, compare different revisions, revert to previous versions, and safely collaborate with other users working on the same set of files. This post aims to provide some tips for doing version control with Subversion that will help you become a pro Subversion user.
Subversion does not impose any restrictions on how you organize your files and directories. However, best practice recommends that you structure your repository properly before you start committing files into it. There are many ways to structure the repository. The Apache Subversion developers recommend the use of a “project root” which contains three subdirectories: /trunk, /branches, and /tags. A repository may have one or more project roots.
The trunk is where you store your latest versions of the files and directories. It is a good idea not to flood the trunk with commits of incomplete changes. Instead, you can do significant changes and modifications to your files using branches, without disrupting the newest version of the file. Then you can use tags to mark “code milestones”, which provide a snapshot of the files at a certain point in time at a known state (e.g. release X).
In software development, new features are often introduced concurrently. One recommended practice is to create a branch where you will save files while developing the new feature. This is important because when bugs arise during your development, you won’t disrupt the work that is currently in progress in the trunk. Also, you are able to revert to a previous revision on the branch without affecting the trunk. When you are finished coding the new feature and testing it, then you can merge the code in the branch onto the trunk. The trunk will then have the merged latest version of the files. At this point the branch can be safely deleted.
When you make modifications to your files, it is an important practice to always write descriptive commit log messages citing why the modification is applied. This is especially necessary in collaborative work. When your team reviews the files, they can automatically see why certain changes are applied to those files. Also, in case a bug must be fixed, developers must check the modifications that could have caused the bug to arise. The short explanation of modifications could help find the possible cause of the bug and suggest necessary changes.
Subversion does not need to assume that every file must be version controlled. Some outputs like pdf or postscript files, which are generated by converting documents, need not to be placed in version control.
In Subversion, each directory can have a svn:ignore property assigned. This property consists of a list of file patterns that the Subversion operations will ignore. When set, the svn:ignore property can filter unversioned files when you use the commands: svn status, svn add, and svn import.
You can set a svn:ignore property on a directory by running the command:
svn propset svn:ignore <pattern> <directory>
Where <pattern> is a list of files or wildcard patterns to match files that should be ignored (e.g. “*.tmp”) Note: This can also be done using the global-ignores run-time configuration option, which is stored in the global Subversion config file. It is not generally recommended to ignore files this way however, as this configuration setting affects ALL repositories, and is not shared with other users.
A tag is commonly used in version control to describe a snapshot of the project a certain known point in time. Although every commit in Subversion results in a new repository revision that is a snapshot of the file system after each commit, a tag is intended to record a specific revision that represents a known configuration, such as a product release or development milestone.
In Subversion there is no distinction between branches and tags. In fact, they are created the same way. The only difference is where they are located in the repository. This is why it is a good idea to have a defined repository structure from the outset (see point 1 above).
Generally, once created a tag and should never be modified, although SVN does not enforce this. Never commit to a tag, instead create a new branch if you want to make changes to a tagged version.
Adopting some or all of these five pro tips for version control with Subversion in your daily workflow will help you become a more efficient and effective Subversion user.
![]() We are thrilled to announce the immediate availability of Git hosting across all ProjectHut plans. Git is the world’s most popular Distributed Version Control System (DVCS), and the addition of this powerful tool means that ProjectHut now supports any distributed or centralised version control workflow that your team needs to maximise their development productivity.
We are thrilled to announce the immediate availability of Git hosting across all ProjectHut plans. Git is the world’s most popular Distributed Version Control System (DVCS), and the addition of this powerful tool means that ProjectHut now supports any distributed or centralised version control workflow that your team needs to maximise their development productivity.
Every ProjectHut plan, both new and existing, have been extended to include Git support. The number of Git repositories assigned is the same as the number of Subversion repositories. So for example, a Developer plan with 5 SVN repositories now also includes an additional 5 Git repositories, effectively doubling the total number of repositories, should you wish to use both tools. As usual, our Enterprise plan has no limit to the number of Git repositories. To find out more, checkout our updated Pricing page for a description of the plans available.
So what can you do with Git that you can’t with Subversion? Well the primary difference is that a checked-out copy of a Git repository includes the full history of the repository, rather than just the most recent revision. This makes local commits and merge operations extremely fast, and actively encourages the effortless creation and use of branches.
With Git, your developers can share and work on branch changes together, even independently of the central ProjectHut repository. It allows your team to design a development workflow that best suits your product and your organisation.
 As with all the services offered at ProjectHut, security is our number one priority. Our Git repositories can be accessed only via encrypted and authenticated HTTPS network connections. We provide the ability to precisely control access to each Git repository, allowing you to specify exactly which users or groups should be granted access. For projects that require it, there is also the ability to allow public (non-authenticated) read or write access if desired.
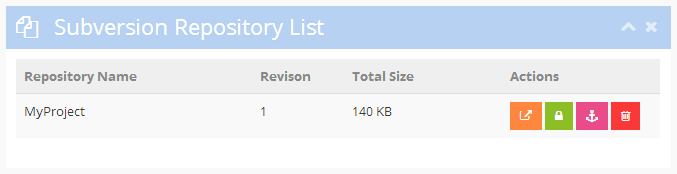
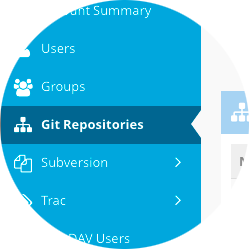
To get started with Git now, login to the ProjectHut Control Panel. Regular users will notice a new Git Repositories option in the menu. Here you can create and manage your repositories, assign permissions and edit other repository settings.
In addition to using your favourite Git client, you can also view the status and browse the commit history of each repository using your web-browser. A Gitweb interface is provided at the same URL as each Git repository. For security, this area is also password protected, so only authenticated and appropriately authorised users can access it.
In conclusion, we are extremely excited about this new addition to our service offering. We encourage all users to try it and see for themselves the benefit of utilising a Distributed Version Control System in your workflow. We remind anyone who already has Git repositories that that they wish to import, we are happy to import them free of charge – simply submit a support ticket and we will be happy to help!
For any general tips or suggestions you might have on the service or the updated Control Panel, please take the time to send us feedback. Enjoy!
Have you ever collaborated with other people to work on a project? Did you experience the pain of swapping files to make changes, edits and revisions? Large, fast-changing projects with multiple users need systems that facilitate storage and sharing of files; and track changes in each revision of the file.
A version control system (VCS) is software that facilitates the efficient management of files and directories. Many programmers and designers use VCS nowadays to facilitate tracking of changes in their projects.
Subversion is still the most widely used version control system, which is a more enhanced version of Concurrent Version Systems (CVS), which had had been the number one VCS in the market before other alternatives became more available. Recently, many programmers are starting to use distributed Software Configuration Management (SCM) tools such as Git and Mercurial, that also function as version control systems.
This post reviews some of the top open-source version control systems and tools available today.
Concurrent Versions System (CVS) is one of the oldest VCS in the market. It was developed by Dick Grune as a series of scripts in 1986. CVS is a very simple system that makes sure that all files and revisions are up to date. It still proves useful for designers and software engineers that want to backup and share their files.
CVS has still many clients including Tortoise for CVS on Windows. Also, many integrated development environment (IDE) such as Xcode, Eclipse, and Emacs still support CVS.
Subversion is still the most used version control system, especially in corporate environments. It is distributed as free software under the Apache License. Many open-source projects use Subversion as a repository. This is because other larger open-source projects, such as SourceForge, Apache, Python, Ruby, use it to manage their project development and releases.
What are some benefits of using SVN? Firstly, working copy of files are always writable and all changes done to it are local until it is committed to the repository. There is also an easy access to commit logs that describe the change history, and an ease in reverting unwanted changes. SVN also integrates with almost everything, such as Windows and various websites. And it is known for its ease of setup and administration.
Distributed version control systems offer new functionality over the central repository systems used by CVS/Subversion (SVN). Unlike SVN and CVS, which use centralized version control, distributed SCMs do not necessarily have to have a centralized code or master copy of the software. Imagine if your team is working on a project, and you have a repository on your server. You can clone the entire repository to your laptop, and take it away with you. You can then work at home, on a park, or wherever you wish. Also, distributed version control systems (DVCS) have more functionality to offer, but they are also a little more complicated.
Git was originally created by Linus Torvalds to manage the source code for the Linux Kernel project. It is free software distributed under GNU General Public License. It is the most widely used DVCS and is known to be a fast and efficient system.
Git has many remote hosted repositories, with services like GitHub popular with open-source projects. The distributed nature of Git makes it easy for users to contribute on a large project with minimal centralized coordination. However, Git isn’t as easy to understand for beginners unlike CVS or SVN, and some organisations prefer the centralized control offered by SVN/CVS.
The second most popular distributed version control system is Mercurial. The name “mercurial” means relating to or having characteristics (which include fluency, agility, cleverness) attributed to the god Mercury. The creator and lead developer of Mercurial is Matt Mackall.
It is very similar in many ways to Git, although it is a much simpler system that is why it appeals to some programmers. Mercurial was also designed for large projects, but that doesn’t mean that small programming teams could not use it. It is superbly fast given that the creators made the software with performance as its number one feature.
These are four of the most popular version control systems in the market today. Although there are many others available, these are the VCS that you are most likely to encounter. Choosing Git or Subversion for your next project will ensure your version control system is best understood and supported by your developers.
Have you tried working with Subversion, the tool that saves a history of all revisions of your files? Version control with Subversion enables you to track and manage all the changes in your files, compare different revisions, revert to previous versions, and collaborate with other users while catching and managing any conflicts that may occur.
This post aims to provide some tips for new users on doing version control with Subversion. These tips are general in nature, but also contain some instructions specific to TortoiseSVN.
Subversion is designed to ensure that you don’t lose the changes you make to a file. But what if you DO want to undo those changes? The ‘revert’ command in Subversion that will do exactly. To revert means discarding all changes or modifications that are made to files that are not committed yet, are restore it back to the last known state.
Subversion ensures that you usually delete the right file by asking you with a prompt. If you happen to select the wrong file to revert and accidentally clicked “yes” to the prompt, you can still retrieve the file. TortoiseSVN does not just revert your files, it also moves the file to the Windows recycle bin. So you can find your files in the recycle bin and simply restore them.
Note that using the recycle bin is optional. You can disable the use of recycle bin when reverting by unchecking the option “Use recycle bin when reverting” in the settings dialog of your Subversion.
When doing version control with Subversion, you can move and rename versioned files inside a working copy. If you want to rename a file or folder in place, use the Context Menu, then click Rename. You must enter a new name for the file and you’re done.
If you want to move files around inside your local copy, perhaps into a subfolder, select the files or directories you want to move. Drag them into the new location inside the local copy using the right mouse button. Release the right mouse button. In the popup menu, select Context Menu then choose SVN Move versioned files here.
Important: if you move or rename files without using proper Subversion commands it can lead to errors. For example, if you rename a file named file1.txt to file2.txt without using the Subversion command, file1.txt will appear as missing, while file2.txt will show up as “non versioned” in the commit dialog (Check for Modifications dialog).
You can still correct your files by going to the Check for Modifications dialog or commit dialog. Then you must select the files (Ctrl-click), right click, and choose “Repair move” from the context menu. The “Repair move” command will only work if two files are selected— one “missing” file, and another “non versioned” file. This is the only that way can Subversion find out which file was renamed. By executing the command, Subversion repeats the renaming of the file.
The revision graph shows you a quick overview of your project. However, you cannot share your graph to other people unless you save it as an image. If your graph is small, you can simply save it as .png file. You can also save the graph as .wmf file but note that .wmf files can only open in Windows.
If you are using TortoiseSVN 1.7 or newer, the revision graph can also be saved as a .svg file. A .svg file stores the image in a vectored format and hence it can be resized without affecting its resolution, unlike a .png file that is pixilated when enlarged. It can also be viewed in all modern browsers.
When zipping or archiving files, you may want to remove the hidden .svn folders inside your Subversion working copy. To do that, you can export in Subversion. Exporting a working copy will create a copy of the files without the unwanted .svn folders, however Subversion can no longer track changes in the exported copy.
Right-click on a working copy and choose “Export” from the context menu. A browse dialog of folders is shown where you can choose the folder where you want the new working copy to be exported to. If you select the same path of your working copy (that is, you are exporting a working copy onto itself), then Subversion will remove all hidden .svn folders of that local copy.
It is possible for you to move or copy your files not only with the left mouse button, but also with the right mouse button. What is the difference between the two? Left drag does the command immediately, but the right drag will first show a menu where you can choose the operation.
Subversion provides additional commands in the right drag context menu. When you drag unversioned files using the right mouse button, you will be given a context menu that will enable you to add the files/folders to the working copy. An entry “Apply patch” will also show up if you drag a *.patch or *.diff file onto a working copy. This command opens up Subversion Merge allowing you to apply the patchfile to that working copy location.
Also, if you right drag a file into the location where the file already exists, SVN will ask you if you will rename the file, overwrite it, or cancel the move. Hence, right drag is useful when you simply want to export your working copy to another folder, as well as when you want to reorganize your files by copying and moving them around.
These five beginning tips for version control with Subversion should help you get started today. Make sure to come back for more Subversion tips in the future!